Time is Money: Save both with the new Dynamics 365 Project Operations Time Entry App
- Sebastian Sieber

- Mar 11, 2025
- 6 min read
Do you ever feel like your day slips away before you can even log those last few work hours?
Entering the Dynamics 365 Project Operations Time Entry Canvas App – your new best friend in streamlining and simplifying time tracking.
In this first look, we’ll explore how this intuitive, mobile-friendly app integrates seamlessly with your existing Dynamics 365 Project Operations environment. Whether you’re managing a fast-paced consulting team or juggling tasks on a hustling construction site, get ready to discover a tool that has the potential to transform time-tracking from a dreaded chore into a strategic advantage.
Please note: This new feature is only available with the 2025 Release Wave 1 enabled. As the preview of the wave updates and the feature itself is in preview, it is not meant to be enabled or enrolled in productive environments.
Dynamics 365 Project Operations Time Entry Canvas Apps
After the successful update to the available version (4.131.0.105) for Dynamics 365 Project Operations, the Dynamics 365 Time Entry app will appear in the App overview of your Environment:

In case you're not the admin or the installation / update of Project Operations was done by someone else, the app needs be shared first before it's accessible.

Let's talk about the Application. Finally. Let me show what happens on the different screens of the application.
My Time
The My Time screen is the first screen to greet the user. It offers a date picker in the right upper corner and pre-loads the current week including a weekday overview:
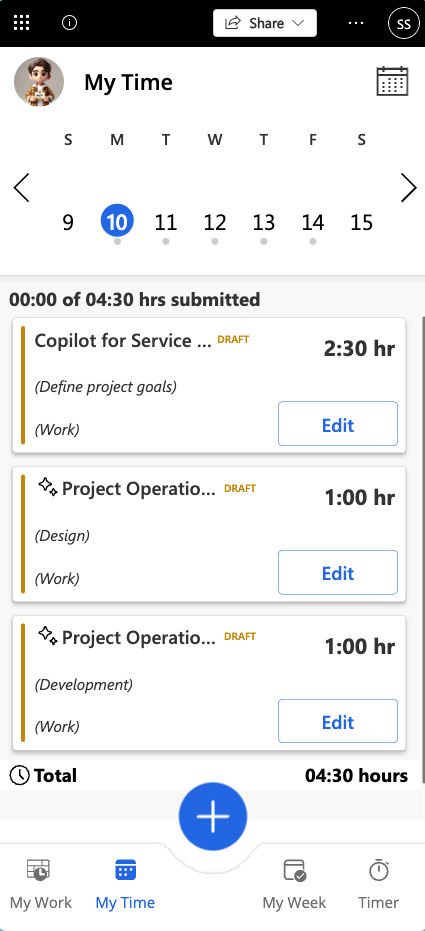
Each workday with a dot underneath indicates at least one Time Entry created on that day. The user has access here to all already created time entries across the past and future (for planning purposes). Each time Entry displays information based on the Project, Task, Description, Status (here Draft) and Type (here Work).
After creation there is still the option to edit the details of the single Time Entry. For example changing the Role or the Task I initially selected. In our case I want to add a Description to provide a bit more details.

A nice addition to edit screen is to save and submit the time within one click. This saves my time and feels straightforward for reviewing additional details which I can review at the first glance.
Submitting is also supported by selecting one or multiple draft records in the My Work screen. The user can also delete a draft record:

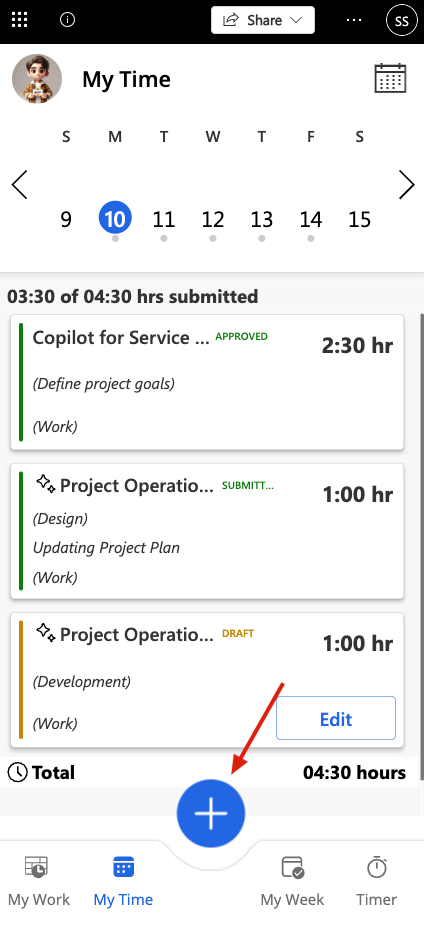
After submitting, the status is updated and the approval was created for the Project Manager. Submitting also updates the indicator on the top, that displays how many hours of my total recorded hours are submitted:

After approving (by the Project Manager, this does not happen in the Canvas App) the Time Entry displays as approved what enables me, as Team Member, to be aware of the submission status.

Once a record is approved or submitted, the user can only recall the entry. In case the Time Entry is approved already, the recall needs to be approved again by the Project Manager.
Everything aligned to the Project Operations Time recording process.

Create a new Time Entry
A new Time Entry can be created via the big blue plus button in the middle of the screen. Better said, on every screen. No matter which tab I'm in, the button is directly available, which feels convenient and provides a direct tracking of the done work
The time entry creation form provides the same information as the edit form earlier. As a Team Member I only have access to current assignments and projects which reduces the options and speeds up the creation process itself.

The new time entry is directly added to the list of my today's records where I can change, submit or delete the record

My Work
The tab on the very left, My Work, provides the end user an additional option to quickly create new Time Entries.

The My Work view focuses on the assigned Projects and Tasks. From here I can directly create a new Time Entry for my assigned Tasks. In the creation form, the Project and Task will be pre-selected directly, which makes it even easier for me to enter the time.
The user is supported by a search functionality to filter the for Projects and Tasks:

Additionally, every user can pin their favorite or most booked Projects. This adds the Project to very top of the view for a quicker access to my most recurrent work task:

What bothered me a little, the UI seems to need some small adjustments here still. It looks too compressed in my cased and letters cut off.
But don't forget, it's a preview 😇
My Week
The first tab to the right, My Week, helps the user to analyze their work week with support of a chart. The chart displays all the different status of the Time entries across the week.
In my case Draft, Submitted and Approved.
An additional information to my target working hours would make that experience even more beneficial.

But, I don't like the colors to be honest. Luckily we're able to change them to the cooperate identity, or in my case, just to colors I enjoy more.
In order to change the color, we have to find the Environment Variable Time Entry Status Colors via the Solution explorer.

When opening the Environment Variable, we're able to the a New value to the variable. Please don't change the Default Value, always add a new one.
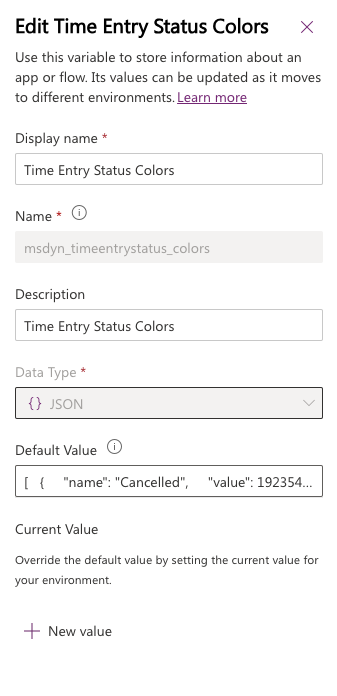
But you should use the Default Value as a template:
[ { "name": "Cancelled", "value": 192354320, "color": "#A80000", "border": "#945C19" }, { "name": "Draft", "value": 192350000, "color": "#C48703", "border": "#1d2519" }, { "name": "Returned", "value": 192350001, "color": "#A80000", "border": "#AA8B19" }, { "name": "Approved", "value": 192350002, "color": "#107C10", "border": "#461F99" }, { "name": "Submitted", "value": 192350003, "color": "#107C10", "border": "#13846F" }, { "name": "Recall Requested", "value": 192350004, "color": "#C48703", "border": "#2E5FA9" }]Each "color" refers to the hex code for each status. As we can see in the default setup, the color for Submitted and Approved is identical. So we see the same type of green in the chart and the app itself.
In order to change the values now, simple add a new value with your desired hex code values. Usually pastel color schemes work pretty well, but in this case be aware that some labels are on white background.
After adding the new custom value, make sure to publish your changes and refresh the application. In my case I choose some blueish color scheme:


Please be aware the colors are changed for all users in that environment.
Timer
The last tab in the app, on the most right, is called Timer. This is made especially for employees starting on a task and want to run a stoppage timer while working on it.
Once started the timer, the user can continue working on their task. Once the task is down, you simple stop the timer again and add the details for the future Time Entry.

The Time Entry is created as placeholder in the first place. I first have to enter the details before syncing it back to the database.

Switching between the tabs won't stop the timer, but closing the application will do.
This will also remove the not created Time Entries. They're only cached for the matter of the session.
Access the Dynamics 365 Time Entry App on mobile
The app is designed for the mobile experience, therefore it makes most sense to review the functionality in the Power Apps Mobile Application.
Android https://play.google.com/store/apps/details/Power_Apps?id=com.microsoft.msapps&hl=en_AU&pli=1
Once the app is installed on your phone, you can sign in with your organization credentials and should find the Time Entry App within your shared apps. Just be aware the phone app will show you all canvas apps in your organization you have access to. Including all organizations, this can be quite confusing.
Just make sure to find the correct app and organization combination.

From here you can also mark the app as favorite or open the app on startup of the Power Apps application.
While the previous screenshots were taken in my browser, emulating a phone, this is an actual screenshot from the phone experience

Because the web version still needs some tweaking, I want to recommend testing the app on mobile.

Conclusion
The application makes a good first impression. The Dynamics 365 Time Entry Application helps streamlining and simplifying time recording, especially for project members preferable with mobile devices.
I do hope for some more improvements and constructive feedback during the feedback to make the experience more smooth with GA. I also hope for the announced Microsoft Outlook integration which seems to be final game changer.
What do you think of the app?

Comments